Introduction
December 4th 2017 had big changes to the driving test, the DVSA has taken the left, right reverse and the turn in the road exercise and replaced it with driving into a baying bay and park on the right hand side of the road and reverse back 2/3 car lengths.
Your instructor may still cover the left (maybe right) reverse around the corner and the turn in the road but it will be taught but to a lower level.
Once you have covered reversing in a straight line, reversing around a left (maybe right) corner, turn in the road with little or no help from your instructor you will be ready to undertake a more difficult manoeuvre the reverse park (parallel park) exercise.
The reverse park exercise is needed skill as there are more vehicles on the road than in the 1970 or even 1990's. So you need to be able to park outside your own home, a busy street or even town areas.
There is never sufficient space to drive forward into a vacant parking space and therefore your only option is to reverse into a space.
The reverse park is about using revere gears and controlling the vehicle as your control your vehicle around and behind someone’s parked vehicle.
Teaching Strategy
Your instructor will prompt you as much as you need on previous lessons covered i.e. … P.O.M cockpit drill, gear changes, the hand and foot controls, Hazard and L.A.D.A routines, open/closed junctions, roundabouts, Traffic lights and A180.
General drive instruction will be given by your instructor to a level to suit you… full talk through then reducing to either prompt or independent while driving to the reversing location.
Lesson aims
The aim of today’s lesson is to drive to a suitable location working on the hazard and L.A.D.A routines then be briefed on the reverse park manoeuvre then you can practice this manoeuvre using clutch control while reversing slowly.
During this lesson you will be assessed on your general drive to and from the training location and will be giving you as much support as you need to improve your driving skills, you will also get a better understand of the biting point/clutch control while reversing and observing out of the rear window and the proper effectiveness of the use of mirrors.
Objective
Your objective will to be as independent as possible and by the end of your lesson be able to understand the reference points on this exercise while reversing so you can complete the manoeuvre with little or no help from your instructor.
Lesson brief
Location where to do the manoeuvre
Make sure where you intend to reverse is a straight curb and is safe, legal and convenient location.
Ensure the gutter is free from debris on the road (as you don’t want to get a puncher flat tyre).
The end result is for you to be parked (roughly) a 12" (drain width) from the curb.
Steering
Throughout this manoeuvre you will need to steer briskly with your steering wheel, while using good clutch control so this will keep your vehicle slow guaranteeing a successful manoeuvre.
The key to this manoeuvre is quick hands and slow feet. (Fast steering and good clutch control).
To achieve best clutch control move your clutch £1 up and down for the biting point position.
Preparing, observing and manoeuvring next to the target vehicle.
Prepare
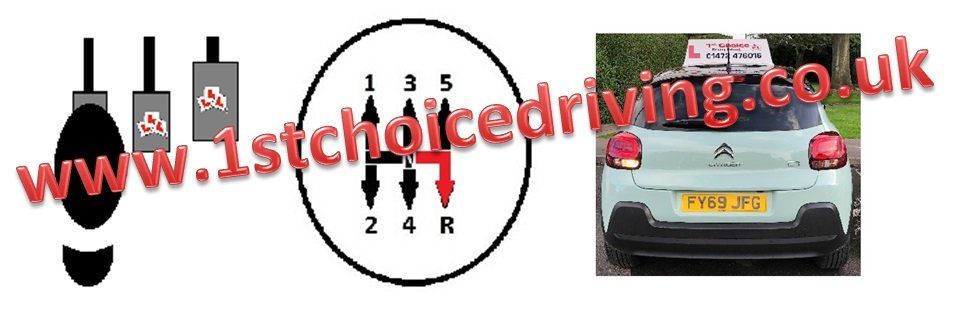
1st gear.
Observations
6 point check so go from your left shoulder to the right shoulder.
Move
When no vehicles are driving towards you.
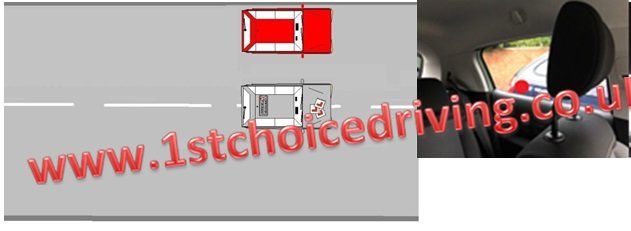
Pull alongside the target vehicle
In a realistic situation you would park alongside the target vehicle straight away however on a driving practical test you are pulled up on the left hand side of the road first.
Distance from the target vehicle
When it is safe pull up next to the target vehicle about ½ to a door length to it (this will keep a safe distance once you are reversing).
Position
Position your vehicle parallel to the target vehicle so that it will allow sufficient room for
oncoming vehicles to pass.
The closer you are to the target car the more difficult it will be to get a suitable angle to reverse into the space available (roughly 1/2 to a 3/4 of a door length).
Use of seat belt
By law you are allowed to remove your seatbelt, however it is not practical as you could forget to put it back on or if you need to abandon your manoeuvre because a vehicle has come behind you.
You will always need to put your seatbelt back on before you drive forward.
Releasing your seatbelt can help you to see more out of your rear window when you're looking over your left shoulder, however if you shuffle around in your seat you can look through the rear window by looking over your left shoulder a lot easier.
Camber of the road
Most roads do have cambers however it may give you a problem when you are on your last part on this reverse manoeuvre, as you could pick up unnecessary speed because of the decline of the road.
Starting point next to the target vehicle
Ensure your vehicles wing mirror looks like the below picture so your n/s wing mirrors is in front of the target vehicle.
Preparing, observing and manoeuvre
Prepare
Reverse gear.
Observations
Reverse the 6 point check so go from your right shoulder to the left shoulder, so you’re looking the correct way (over your left shoulder).
Move
When no vehicles are driving towards you start reversing to your 1st reference point.
Signal your intentions clearly
Make sure your intentions are known, so once you are alongside the target vehicle put your vehicle straight into reverse gear. If a vehicle does start driving towards (or behind) you may be put on a left indicator to back up your intension.
Use your brake lights to also highlight you have seen the vehicle and you have stopped.
Reversing pace
When reversing backwards maintain a slow walking/crawling pace.
Immediately get ready to reverse (reverse lights become a signal to the following traffic).
Reversing to first P.O.T.
Now you are ready to reverse back to the point of turn (P.O.T).
There are many reference points on this reverse exercise:-
These will be discussed on your lesson.
Starting the manoeuvre
Point 1
Preparing, observing and manoeuvre
Prepare
Reverse gear.
Observations
Reverse the 6 point check so go from your right shoulder to the left shoulder, so you’re looking the correct way (over your left shoulder).
Move
When no vehicles are driving towards you.
Amount to turn
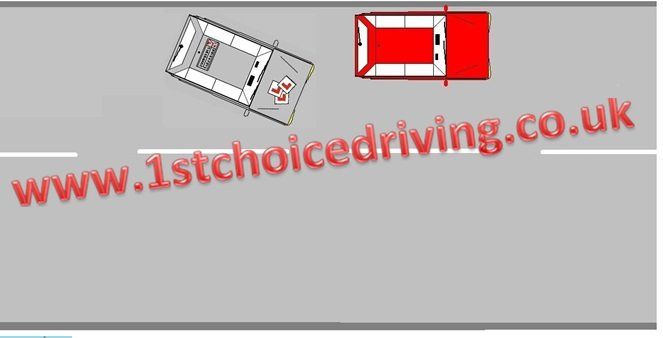
When you know it is safe to commence the first part of your manoeuvre you slowly reverse and briskly apply 1 revolution (or ¾ turn depends what’s advised) to the left.
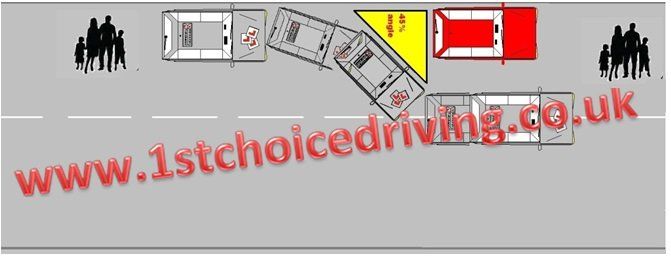
45 degree angle
As you lowly reverse back your front end of your vehicle will start to move out into the road so ensure you are constantly looking around and stop for any passing vehicles.
Point 2
Slowly reverse back until your vehicle is about a 45 degree angle (diagonal to the curb) your NS exterior mirror is roughly half way across your target vehicles wheel arch (above picture).
At this point stop and look to see if you are close enough to the curb to start point 3.
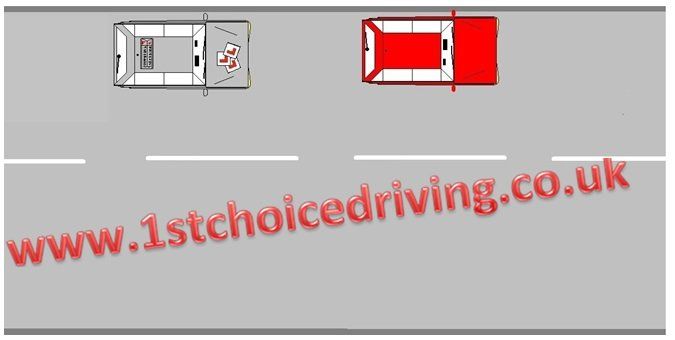
Point 3
When the back of your vehicle is about one and a half feet (drain and a half width) from the curb you then briskly apply 2 Revolutions (or full lock) to the right.
Again as reversing back but please keep stopping to ensure you are the correct distance from the curb (this will be discussed on your brief on your lesson to learn how to correct the position if it’s too wide or too close to the curb).
Point 4
When your vehicle becomes parallel to the curb you then briskly straighten your front wheels up by ether applying 1 revolution (or 1and a 1/2) to the left.
The aim is to complete the manoeuvre is to park within two car lengths from the back of the parked vehicle and less than half a metre from the curb.
On your driving test although you are not required to move forward it is acceptable to do so, we call this a shunt. However you can only do it once on a manoeuvre as on a test you could get a minor fault for control of the vehicle.
Ensure you have enough space in front of your vehicle that you can still pull away from the target vehicle in front without having to reverse again (easiest way to know you have reversed far enough back is to see tyres and tarmac of the vehicle you have just reversed behind).
Also there will not be a vehicle to close too behind you cause a problem behind you.
All round awareness.
Watch out for pedestrians from either side of the road who may cross behind you as you attempt to reverse on all points of your manoeuvre.
Continually look over your left and right hand shoulders.
Check that you will not present a hazard to passing vehicles as your vehicle swings out.
Similarly ensure you will not hit the rear of the target vehicle with the front of your car as you swing in.
Dealing with other road users
You must always give way and stop to other road users that come in front and behind you.
You will find waiting vehicles are not that patient, so once you have moved to the 45 degree angle they will probably start to drive past you “so you will have to stop and wait”
You must give way to any pedestrians crossing behind and avoid swinging your vehicle out into the path of overtaking or oncoming vehicles.
Keeping calm
Other experienced drivers will appreciate that if you rush this manoeuvre you will end up taking longer and run the risk of hitting something or someone.
Therefore if traffic appears once you have started the manoeuvre you will usually find that they give you priority.
Under no circumstances allow yourself to be hurried when doing this exercise.
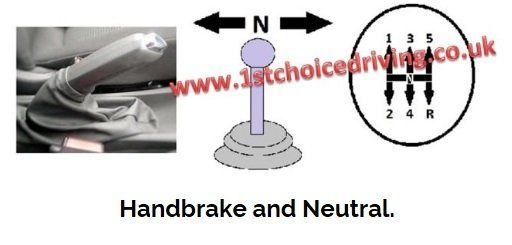
Make your vehicle safe
Once you have reversed far enough make the car safe by applying the handbrake and put your vehicle into neutral.
Once you have practised the exercise you will be asked to drive on to practise around another vehicle that is a different size.
Only reverse behind the same vehicle a maximum of 3, as it is somebody's property and if you think about it would you want to watch a learner reverse behind your vehicle 10/20 times, I think not.
Preparing, observing and manoeuvre (P.O.M)
Prepare
1st gear.
Observations
Normal 6 point check so go from your left shoulder to the right shoulder.
Move
When safe.
Don't forget to fasten your seat belt before driving away safely that’s of course if you had taken it off.
Reflect & Review
So remember your instructor is there to HELP you so on your driving lesson if you have any uncertainties or need anything rewording or recapping to make things any clearer, just ask.
Your training Vehicle is fitted with dual Controls and if necessary could be used throughout your lesson if needed. These are here for your safety so we can step in to keep you safe.
So don’t worry if the issues arise we will aid & guide you VIRBALLY or PHYSICALLY and we can go over the situation if happens to correct if in the future.
Risk management
Physical control of your vehicle
The aim is for you the student to have full control of this lesson with previous lessons and have full talk through on the new topic and then reducing the support throughout with you decision making as best you can.
Your instructor’s job is to analyse any faults or new faults that may accrue in this lesson and put them right.
Talk about any issues if the situations happen on the driving lesson and put issues right.
- Fault identification.
- Fault analysis.
- Remedial action.
Level of instruction on your lesson
- Full talk through.
- Prompt.
- Independent.
End of lesson
- Feed back at the end of your lesson.
- Student’s responsibility of lesson and improvements.
- Plan for the next lesson.