Straight line reverse on the left hand side of the road.
Straight line revers on the left hand side of the road.
Introduction
This topic is covered once you are able to turn left, right and emerge on quiet roads under prompt instruction. Straight line reverse will help to develop your clutch control as you move the clutch from the biting point £1 up and down.
This lesson you will be incorporating skills you have already covered going forward on this 1st reversing exercise.
- P.O.M when reversing (From right side to left side).
- The basic routine or hazard drill when reversing.
- L.A.D.A. when reversing.
- Who to give way to when reversing.
Teaching Strategy
Your instructor will prompt you as much as you need on the way to the location (cockpit drill, moving off, stopping, M.S.P.S.G+L.A.D.A routines, gear changes, hand/foot controls). Then at the training location give you full knowledge on how to reverse back 3/4 car lengths under full control.
Lesson aims
The aim of today’s lesson is to drive to a suitable and quiet location working on the hazard and L.A.D.A routines on your general drive and once at the location then be briefed on the Straight line reverse manoeuvre. Then you can practice this manoeuvre using clutch control while reversing slowly (crawling pace), reversing backwards roughly 6/8 car lengths.
During this lesson you will be assessed on your general and will be giving you as much support as you need to improve your driving skills, you will also get a better understand of the biting point/clutch control while reversing and observing out of the rear window and the proper effectiveness of the use of mirrors.
Objective
Your objective will to be as independent as possible by the end of your lesson with little or no help from your instructor.
Lesson brief
Straight line reversing exercise is the first
sub skill
you need to learn before reversing into parking bays and reversing around corners.
(Please note the reversing around corners and the turn in the road are no longer a part of the DVAS driving test, however you will still be taught these manoeuvres at a lower structured level).
Location.
Make sure where you intend to reverse is curb is straight and you park somewhere safe, legal and convenient.
- Park (roughly) a 1ft (drain width) from the curb.
- Ensure it’s free from parked vehicles, obstructions and no debris on the road as you don’t want to get a (puncher) flat tyre.
- Never reverse on a main road and NOT on a one way street for a long period of time.
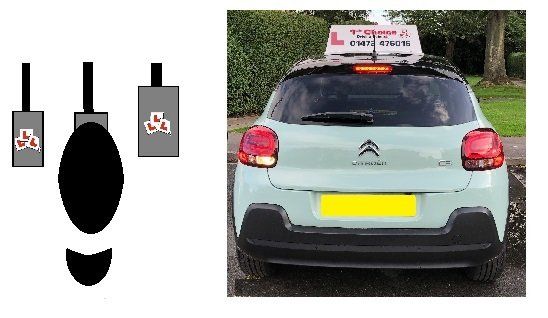
Select reverse gear.
When selecting reverse gear the white lights (reverse lights) come on at the back of your vehicle, so the vehicle coming toward (from behind) you will know your reversing. When this happens you will need to press your brakes to activate your brake lights telling them you have seen them and stopped.
Please note reverse gears are in different places so your instructor will guide you on correct position on the gear stick.

Hand(s) position
Hand(s) position.
When reversing you would usually hold the steering wheel with your right hand at the 12 o’clock position and the left hand at the 7 o’clock position. This will hopefully keep the vehicle to stay in a straight line when you are looking out of your rear window when reversing.

Use of seat belt
By law you are allowed to remove your seatbelt, however it’s not practical as you could forget to put it back on or if you need to abandon your manoeuvre because a vehicle has come behind you. You will need to put it back on before you drive forward.
Releasing your seatbelt can help, however if you shuffle around in your seat you can look through the rear window by looking over your left shoulder a lot easier.
Camber of the road
Most roads do have cambers however they should not be a problem on this reverse manoeuvre.
Preparing, observing and manoeuvre
- Prepare - Clutch down, reverse gear (you shouldn't need to set any gas).
- Observations - Reverse the 6 point check so go from your right shoulder to the left shoulder, so you’re looking the correct way (over your left shoulder).
- Move - Reverse slowly backwards when it is clear (no vehicles are driving towards you from your rear).
Who to give way too
This could help when to stop when obstacles are coming towards you:-
- Motor vehicle 6 car lengths from you.
- Cycle about 3 cars lengths from you.
- Pedestrians 1.5 car lengths from you.
Always pause and wait if a vehicle appears from your rear, press your foot brake as this will identify and show that you have seen the vehicle and stopped.
Watch for pedestrians/children on bikes or walking crossing the rear or around your vehicle, you will need to give way and wait for them to be clear before you can continue reversing.
When crossing a driveway to your rear, watch for road users emerging or wanting to turn into the driveway.
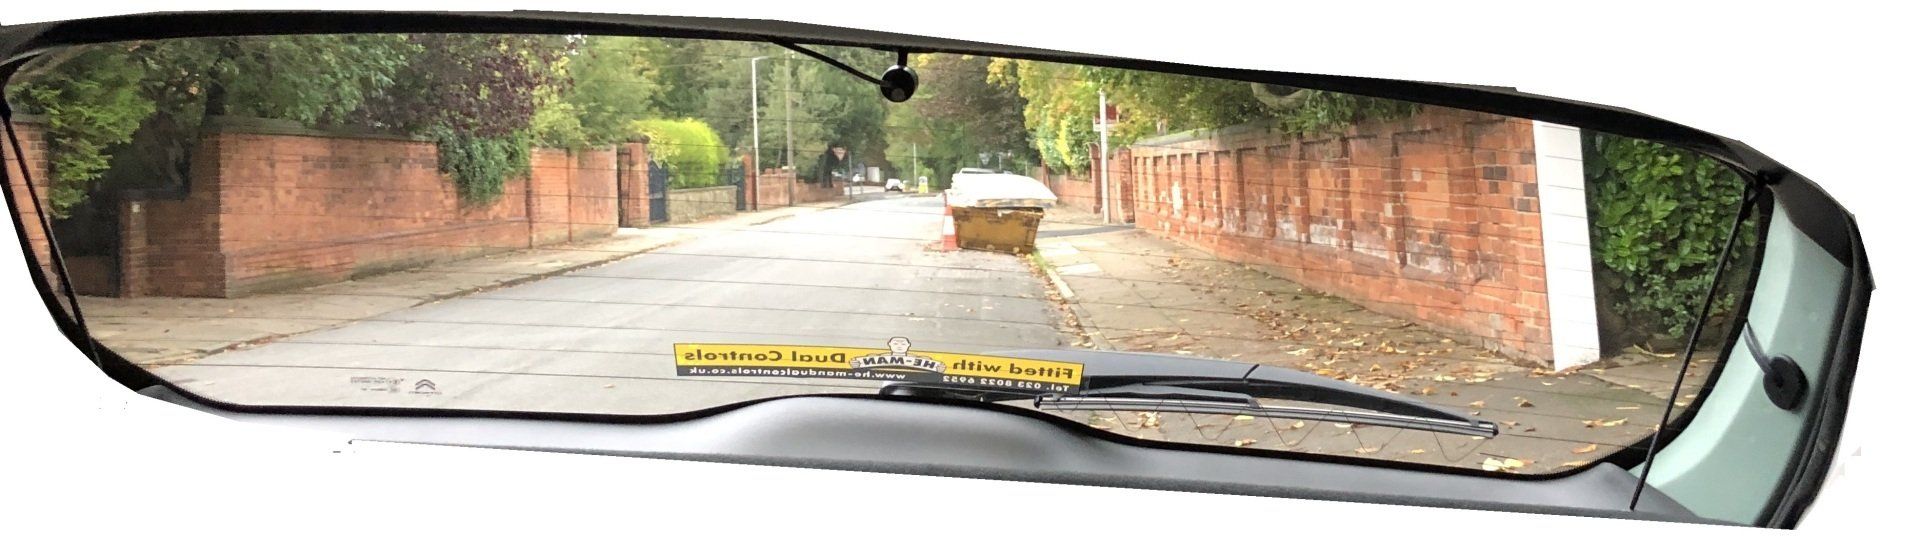
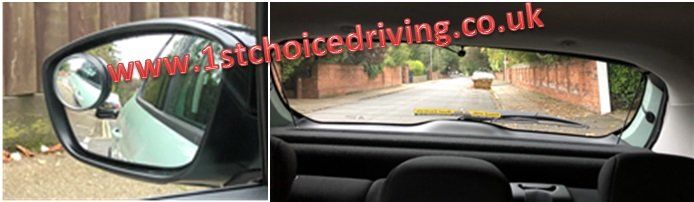
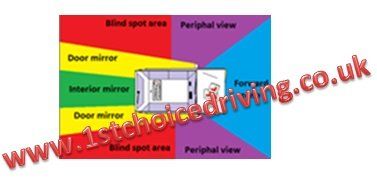
Reference points (so accurate)
- The curb will be roughly in the middle of the back window (diagram below).
- In the near side door mirror (you will see how far away the side of your car is from the curb).
(You may have a small blind spot mirror that’s helpful)
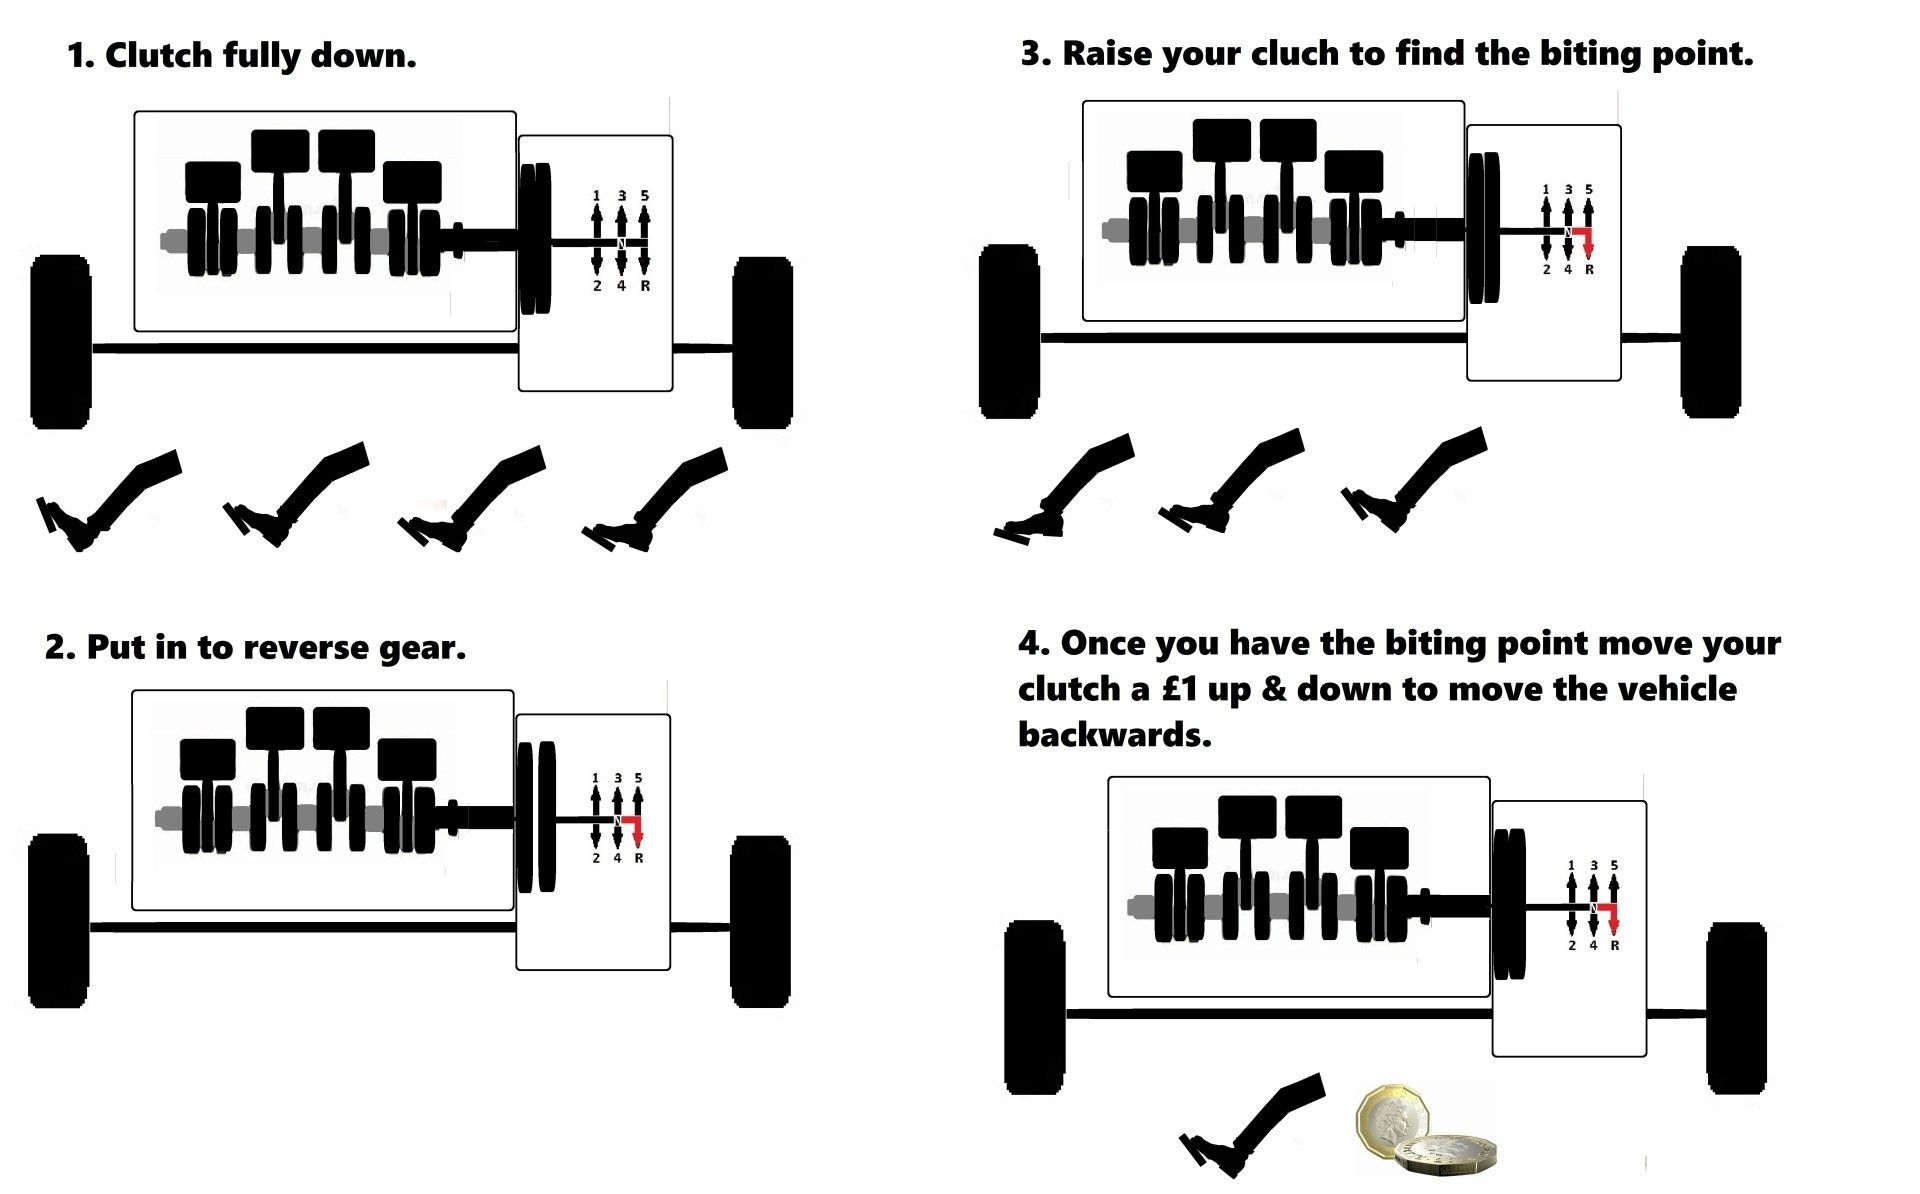
Clutch control
All the set manoeuvres should be undertaken at a very slow speed by using slow clutch control by moving your clutch a £1 thickness up and down from your biting point.
All round observations
While reversing you should be taking observations through the rear window of the vehicle (i.e. the direction you are traveling). Using clutch control and taking all round observations to the front and the sides of your vehicle every car length you go backwards.
The near side door mirror may also be useful for checking the position of the vehicle in relation too the curb.
Use of wheel
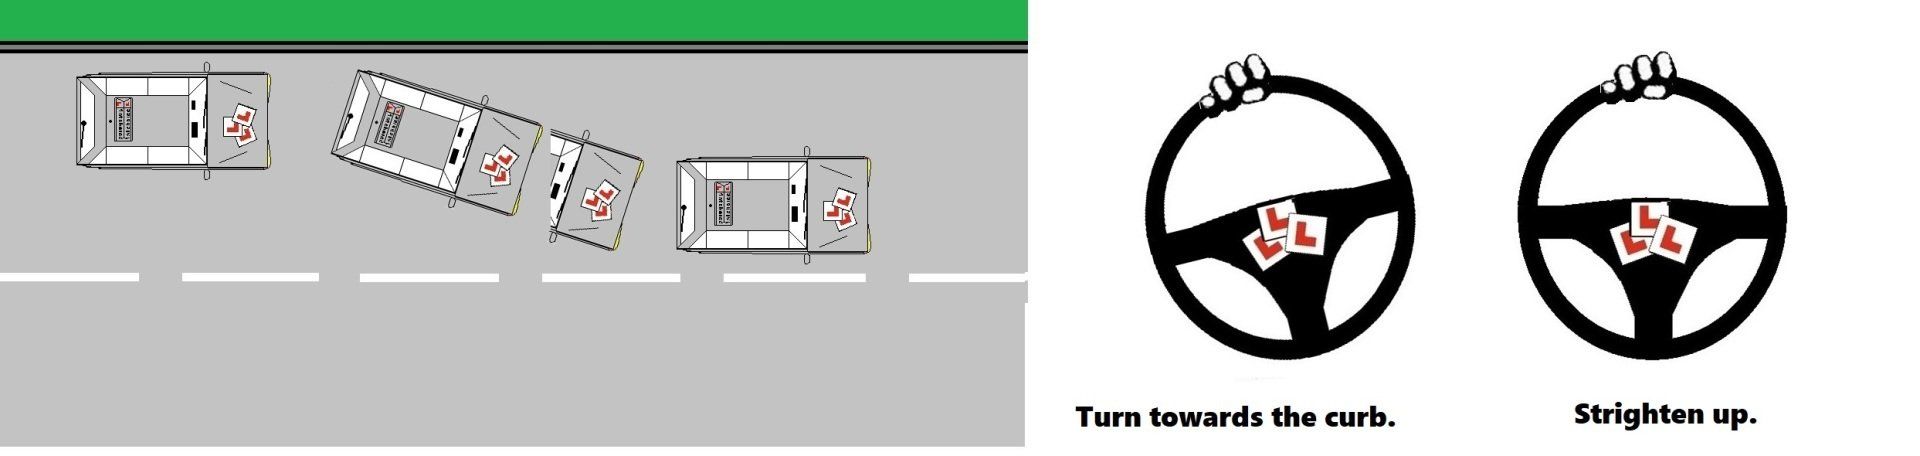
The biggest problem with all reversing is over steering (snaking). So in the diagram below you can see the vehicle is to close to the centre line.
So turn the wheel you want the vehicle to go, so if you need to go towards the curb you turn it left.
Amount to turn.
You only move the steering wheel only 1 hour the way you need to go, so the 6 o’clock position of the steering wheel will be moved to the 5 o’clock position till you vehicle gets a small angle. Then put the steering wheel back to the 6 o’clock position.
Let the back end drift towards the curb then turn the opposite way the same amount.
Once reversed back 2 to 3 car lengths
Make the care safe and put your handbrake on.

Handbrake and Neutral.
Reflect & Review
So remember your instructor is there to HELP you so on your driving lesson if you have any uncertainties or need anything rewording or recapping to make things any clearer, just ask.
Your training Vehicle is fitted with dual Controls and if necessary could be used throughout your lesson if needed. These are here for your safety so we can step in to keep you safe.
So don’t worry if the issues arise we will aid & guide you VIRBALLY or PHYSICALLY and we can go over the situation if happens to correct if in the future.
Risk management
Physical control of your vehicle
The aim is for you the student to have full control of this lesson with previous lessons and have full talk through on the new topic and then reducing the support throughout with you decision making as best you can.
Your instructor’s job is to analyse any faults or new faults that may accrue in this lesson and put them right.
Talk about any issues if the situations happen on the driving lesson and put issues right.
- Fault identification.
- Fault analysis.
- Remedial action.
Level of instruction on your lesson
- Full talk through.
- Prompt.
- Independent.
End of lesson
- Feed back at the end of your lesson.
- Student’s responsibility of lesson and improvements.
- Plan for the next lesson.

Last updated on the 10.05.2024 @ 16.09
All Rights Reserved | 1st Choice driving school Grimsby 2024
